

Adobe Substance Painter to Print Best Practice

This tutorial describes the process of printing your model from Adobe Substance Painter. No additional software is required. We will also discuss design considerations like closed meshes and proper thickness.
-
Step 1: Background
Adobe Substance published an article in February 2021 about Parametric Monotype. The creative team demonstrated traditional 2D design cycles on 3D models.
We worked with Substance to get the files to print. We would say it went pretty well and the outcome is that we can now share with you how to print your Substance Painter projects. View our article in the Substance Magazine.

-
Step 2: Design Considerations
There are two things to keep in mind when designing a part you will print. 1) 3D printable objects must be composed of closed meshes. 2) Areas with less than 2m of thickness may have inaccurate colors.
Lets describe closed meshes a bit further. For rending on screen (ie. videogames) open meshes are great. You can model things like capes and hair while only focusing on the area you will see. It is ok that the model has no volume.
For 3D printing, each model must have a volume. In other works, where does the part start and stop. The substance Meet Mat is a great example of this. Meet Mat has three parts: head, body, and base. Each one is a closed mesh. Each one is then colored and physically textured in Substance Painter.

A cape is a great example which may be made from a sheet instead of a closed mesh. This has no measurable thickness so it cannot print.
-
Step 3: Set Tessellation Resolution
If our model has displacement, we need to set the right resolution. If your model does not use displacement/tessellation, you can skip this step.
Tessellation resolution means how how many triangles are used to save your model. More triangles means your model will have more detail but it comes at the cost of a larger file size.

We will need to make this adjustment for each shader. Go to shader settings. Then click on the pyramid for displacement and tessellation settings.
If "Enable" is not checked, it your displacement scale is 0, you can skip this step.

Slide the tessellation max length while watching one of your fine features. Move the slider to the right to increase detail. Stop moving the slider when the detail stops improving. This will provide enough triangles to print your part without any unnecessary file size.
-
Step 4: Export Mesh
Go to File ➡ Export Mesh. Choose to export with displacement/tessellation if applicable to your model. If it is not applicable, that option will be greyed out which is ok.
⚠ When naming your file, do not use spaces. Underscores are ok. Spaces will cause the .obj to not identify the .mtl file.

After the file saves, check the size of the file. If it is larger than 500MB (500,000 KB) I would recommend deceasing your tessellation resolution and exporting again.
-
Step 5: Export textures
We have the geometry exported but we need to add color to the surface. Go to File ➡ Export Textures. This will export an image for each texture in your project.
Change Output Template to 2D View. This will export the surface color including the environment condition to make the material look real. Then click export.

Here is my texture. You will have at least one for each of your texture sets.

-
Step 6: Link your textures and your geometry
Your .obj file exported with a .mtl file. The .mtl file specifies the material/color for each part in the .obj file.
Open your .mtl file with your text editor of choice. Notepad works just fine for this. Here is my .mtl file.

kd specified the color of the model. We want to replace that with a texture map.
Replace it with "map_Kd " followed by the name of the texture for that part.
Repeat this for each texture.

Then save the .mtl file, and we now have a file with your geometry and color!
-
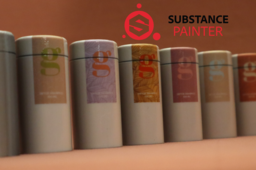
Step 7: Print!
Drag and drop your .obj file into GrabCAD Print.

Here are the printed models using different UV scaling for the material in Substance Painter.

If there are errors, use the repair tool in GrabCAD Print

Errors may be caused by:
- Meshes not being closed
- Displacement being so large that the mesh now intersects with itself
- Displacement on sharp edges disconnected the surfaces of the same part
Here is a 3D printed Meet Mat by Martin Pietras.

