

can anyone please upload a tutorial on how to create animation showing first the exploded view of my model and then the parts going to their respective positions in CATIA V5 ???? I'm uploading Creo Elements_Tutorial

yippee i'm able to make video in Creo But please help me out in CATIA .....
-
Step 1:
Open 7_plate_clutch_assem in Creo
You can Download it from
7_plate_clutch_assem
-
Step 2:
Select Applications from the Main Menu.Select Animation from the drop-down.

-
Step 3:
The Animation Window will appear. Notice that
there are new icons and the timeline has
opened.
-
Step 4:
From the Animation menu select Animation or
select the Animation icon from the
Animation toolbar.The Define Animation window opens Key-in 7_plate_clutch_assem as the name of your animation( by clicking on edit )
-
Step 5:
From the Animation menu select Body
Definition or select the Body Definition icon
from the Animation toolbar.The Bodies window appears
-
Step 6:
Select the One Part per Body option

-
Step 7:
Select Ground
Select Edit
The Ground Body is similar to the base
component in an assembly. The animation is
focused around this component
-
Step 8:
The Body Definition window appears
You are prompted to Select one or more items Select the driving shaft (or any other component), click OK in the Select
window
Select OK in the Body Definition window. You
will notice that the number of parts now
indicates that there is one part in the ground
body.
-
Step 9:
The Bodies window will appear; click on the
Ground body to make sure that the
Body is selected. Select each of the remaining parts and edit them, simply change the names to better
identify the parts. -
Step 10:
You will now begin creating a series of
snapshots to build a Key Frame sequence
Key Frames are used to define the animation
sequence
For this animation you will create a single Key
Frame sequence with multiple snapshots that
will be used at predetermined time intervals to
create the animation.
As you create Key Frames and other portions of
the animation the Timeline will begin to fill up.
-
Step 11:
From the Animation menu select Key Frame
Sequence or select the Key Frame
Sequence icon from the Animation
toolbar .The Key Frame Sequence window appears.Make sure that Ground is listed as the
Reference Body
-
Step 12:
Select the Camera icon to indicate that you
want to take a snapshot
The Drag window and a Select window will
appear
-
Step 13:
The Drag window and a Select window will
appear.Click on Snapshots as indicated, this will open
another window
-
Step 14:
I'm uploading one more snap for clarification.

-
Step 15:
Click on Advanced Drag Options as indicated,
this will expand the Drag window to provide
you access to the necessary controls
Now you will be able to begin making snapshots
for your Key Frame sequence.The first snapshot should be of the completed
assembly
-
Step 16:
With the assembly displayed in the assembly
window as shown
Select the Camera icon this can be thought
of as the snapshot icon. This is not the same
icon as the one that appears in the Key
Frame Sequence window
Snapshot 1 appears on the Snapshot list
Notice that KFS1.1 appears on the Timeline
This is Key Frame Sequence 1 and shows
that there is one snapshot in the sequence
You are ready for the second snapshot -
Step 17:
For the second snapshot the hex screw (any part of your choice) will be
removed from the assembly.Before making the second snapshot, click the Z
axis in Advanced Drag Options. This will
allow you to move the part in a straight
Z direction (or any direction)
Notice the Drag Axes located on the assembly.
Use these to assist in dragging parts before
making snapshots.
-
Step 18:
Select the Camera icon.Snapshot 2 appears on the Snapshot list and in the Timeline as part of KFS1
here shell was removed
-
Step 19:
Similarly one by one all the parts are removed and snapshot (by clicking on the camera and then OK)
is taken until all the parts are removed.
-
Step 20:
one more for clarification.....

-
Step 21:
If you have joints , you can also simulate the mechanism and display it in your animation by adding constraints.

-
Step 22:
If you have followed all steps mentioned above you can check your animation by clicking on start animation & if you are satisfied you can move on.

-
Step 23:
then click on playback to capture your animation as a video file in specified format & at location you want to save.

-
Step 24:
one more for clarification .........

-
Step 25:
PIC below shows how to edit the timeline.

-
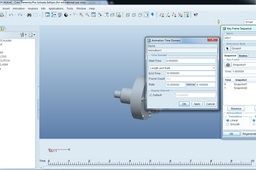
Step 26:
after you do that following will appear & you can make the
necessary changes accordingly.
Animation Time Domain window
-
Step 27:
You can Watch the video at :
http://www.youtube.com/watch?v=MPfcDMknHfA
