

See 'The Light©' with the '3 Step Max'-Challenge

I have realised, that we never disclosed any solution to this challenge:
https://grabcad.com/groups/weekly-challenge-group/discussions/3-step-max
so here comes a complete tutorial on how I did it.
Even though the model is only 3 steps, it contains 7 features and the tutorial use 27 steps, because there are some necessary extra steps needed to make it work in my ancient (but expensive) Solidworks 2014.
You will learn some essential tricks such as 'Fit Spline' along the way and maybe eventually see 'The Light©'.
-
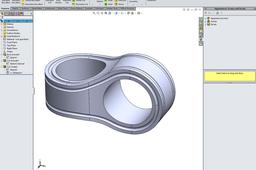
Step 1: The Challenge
This is the original challenge from https://grabcad.com/nathanael.moraitinis-1
Model this part maximum 3 steps:

Then https://grabcad.com/bob.wiley-1 doubled-down and added two groves to make the challenge more challenging:

The page is here:
https://grabcad.com/groups/weekly-challenge-group/discussions/3-step-max
-
Step 2: Solution using Solidworks 2014

Draw this sketch on the Top Plane. I made sure that it is symmetrical around the Origin just-in-case, because I love symmetrical sketches.
Do a 20 mm Mid-Plane Extrude:

And get this result:

-
Step 3: Utilize 'Derived Sketch'
Utilize the power of Derived Sketches because 1) it is cool and 2) we don't want to draw the same sketch again and 3) Copy-Paste is a pain in the butt in Solidworks.
Control-Select Sketch1 and the Front Plane in the Feature Manager and from the top Menu select Insert->Derived Sketch. ('Derived Sketch' is greyed-out if you haven't chosen a sketch and an applicable face/plane).

The sketch derived from Sketch1 pops in, but is unconstrained (=blue) and is oriented incorrectly:

So we need to modify it and fix it. Select it in the Feature Manager and use menu->Tools->Sketch Tools->Modify...

Either punch-in 180 degrees to rotate it or flip it by mirroring it with the Sketch Modifier tool:

When the two opposite L's appear, you mirror the sketch using the right mouse button!
This is what we want:

Now fix it in position by aligning the centre to the Origin:

and line it up with the existing body:

Voila:

Time for a Cut-Extrude 'Through All- Both':

And this is the main body taken care of:

-
Step 4: Stroke of Genius™
Studying the object before you, may reveal to you that it has only one outline, and that the two grooves that we want to create, are placed symmetrically in relation to this outline. Ergo, it should be possible to do a swept-cut that creates everything in one go!
This little sketch (on the Top Plane) is the first step, identical circles and line-lengths, specified via Equal-relations:

I have not tried to Pierce it to the outline yet, because it doesn't work in Solidworks 2014. I can select the outlines with the Selection-Manager Tool, but the Cut-Sweep fails miserably. It may work in later versions...? You can try if you are the lucky owner (of a pirated version :-)
Right-click anywhere on the edge and choose 'Select Tangency' from the pop-up menu.

Next, open a 3D Sketch (Command Manager->Sketch->down arrow->3D Sketch and choose Menu->Sketch Tools->Convert Entities:

This will give you a bunch of splines that connects all the way around the outline, but that still doesn't work well in Solidworks 2014, so we need to use another secret feature; Menu->Tools->Spline Features->Fit Spline:

Drag around everything to select all splines in one go:

The 'Fit Spline'-command makes the outline into one closed spline:

The result is correct when the whole spline highlights when you hover your cursor over any part of it:

-
Step 5: Cut-Sweep, but not tout suite
You can now pierce Sketch3 to the 3DSketch, but first you need to drag Sketch3 below the 3DSketch in the Feature Manager:

Add a Pierce Relation between the intersection point of the two lines from Sketch3 and the 3DSketch:

And align the sketch to the model:

Finally, we can make the swept cut, but in SW2014, you need to choose 'Twist Along Path' in the Cut-Sweep Options, othervise it doesn't work. (I suspect that this is a BUG?):

Drumroll,.... the preview pops-up:

Aaaaaaand it is 'Smooth as a Baby's Butt™':

Only 3 Steps, but 7 Features are involved.

The model is here:
https://grabcad.com/library/solution-to-3-step-max-challenge-1
if you need it.
Cheers,
Steen
