

Convert STL (or OBJ) Mesh to SOLIDWORKS Model (NURBS)

Need to convert an STL (or OBJ) file into a "real CAD model"?
There are several tutorials which already exists for this topic. I'm making a new tutorial to give additional information.
-
Step 1: Inspect and Repair the Mesh
Garbage in = Garbage out (GIGO).
If your STL mesh is terrible to begin with, the resulting CAD model is also going to have defects.
I like to edit STL data in Materialise Magics, or Design X. You might have your own favorite program like Meshlab, or Blender.
Use the tool you are most familiar with, and repair any holes, flipped normals, or other defects found in your STL mesh model.
Here Magics detects several errors in the mesh:

Here the errors have been repaired:

Repairing errors takes skill even in expensive programs with "auto fix" tools. relying on "autofix" will often make the model worse. Or enter a loop where each fix causes previously repaired errors to return.
-
Step 2: Import to SOLIDWORKS
In SOLIDWORKS select File - Open
Set the file type to Mesh

Press the Options.... button to get the screen shown below:

You'll usually want to set the Import As option to Solid Body. Surface Body can also be used. Graphics Body is often the default, and it is mostly useless unless the desire is simply viewing the mesh model.
If you know what units the mesh model was exported with, set the units in this SOLIDWORKS dialog box to match.
IF you have a version of SOLIDWORKS with the ScanTo3D Add-In, consider turning it on. It allows for more advanced importing and repairing of mesh models:

The ScanTo3D Add-In is most useful when working with scan data, but give it a try if you have it. I've used it at work a few times, and prefer to edit scan data in Geomagics Design X, or Geomagic Control.
-
Step 3: Done?
Sadly, this is where the other tutorials end. "Save as a sldprt file" they advise, and you are done.
You could be done at this step if your goal is saving a piece of garbage.
Here are some things to consider before stopping at this point:
· STL files are a rough approximation of a surface.
· A hole in an STL model is not a circle, it is a polygon.
· STL files are made up of thousands of tiny triangles.
· More triangles = finer resolution = larger file size
· SOLIDWORKS has a limit on the number of facets it can open/display. It was 10,000 faces, then it was 20,000. I'm not sure what the new limit is. If you have too many faces/facets, try decimating the model in your favorite mesh editor. Cut symmetric models in half.

· SOLIDWORKS has a limit on the size of model it can display It was 1 kilometer years ago, it may be more now. If your model is too large, try importing it with a different unit, or scale the STL file in your favorite mesh editor.
· Saving a mesh model as a SOLIDWORKS part (or other file format (step, iges...etc)) does not magically remove the thousands of triangles which make up the mesh.
· Mesh models often have large file sizes. Saving a mesh as another file format maintains a large file size.
· If you want a part machined, the machinist will prefer/need a non-faceted 3D model. They won't be tricked by you importing, then saving an STL file as a Step model.
There is no magic button or software which converts mesh models into perfect CAD models. Maybe there will be in the future? Until then, you'll need to remodel the 3D model.
-
Step 4: Remodel (Part 1)
This Gripper model was recently posted in the Questions section with the desire to turn it into a SOLIDWORKS model:

Having the STL model imported into SOLIDWORKS allows some shortcuts to be taken when remodeling:
Tools like Convert Entities, or Intersection curve help extract data to form 2D sketches.
3D features can make use of Up To Surface,Next, Vertex, and Face options.
Let's see how the above was remodeled:
Below is the imported STL file in SOLIDWORKS:

If you notice your SOLIDWORKS performance come to a grinding halt at this point, there are some options which can make things a little better:
- Reduce the number of triangles. The two main ways to do this are decimation in a mesh editing tool before importing to SOLIDWORKS. And, trimming away unneeded portions of the model. The model above is mostly symmetrical, so removing 1/2 or even 3/4 of it is an easy way to reduce the triangle count.
- Turn off the display of Edges in SOLIDWORKS
- Go through the SOLIDWORKS Options and turn off all the options related to Highlighting from the FeatureTree, or Display Window.
- Set up Display States to quickly toggle between the following states: SW bodies shown, STL hidden. STL Shown, SW bodies hidden. All bodies (SW and STL) shown). Changing display states was 2-3 times faster than manually hiding and showing bodies in this example.
-
Step 5: Remodel (Part 2)
Step one is orienting the model in SOLIDWORKS if needed. It will make modeling faster and easier if the imported part is straight, and aligned with the default reference planes.
Orientation may be faster to accomplish in a dedicated mesh editing program, but the Move/Copy Bodies tool can be used in SOLIDWORKS.
Once orientation is complete, it is time to remodel the model. The good news is you can use the imported model as a reference. The bad news is you'll need to know how to make the model.
If you've never made a 3D model of a car, trying to build a car over an imported model is not going to help much. You have to already know how to make a car before you can remodel one.
Below are the steps I used to recreate this model. Total time was about 1 hour (click the picture to make it bigger):


If you invent a way to turn faceted mesh data into clean 3D models, you'll be able to retire early, and rich.
-
Step 6: Other Software?
Question: Are there better ways to rebuild a model compared to importing mesh data into SOLIDWORKS?
Answer: Absolutely.
Geomagics Design X from 3D Systems is a program made for reverse engineering scan/mesh data into parametric CAD models.
But even the best software solutions have limitations. I've used Design X for several projects, and have a love/hate relationship with the software.
- It is expensive.
- Making a CAD model in Design X is painful. Each time I use it, I feel I've stepped out of a time machine, and am using CAD software from 20 years ago.
- Design X can easily cut your reverse engineering time by 50% or more.
- Design X is MUCH more efficient at displaying mesh and point cloud data than SOLIDWORKS.
- You still have to know how to make the CAD model.
- Design X has a pretty decent "make surface" tool which tries to convert a mesh into a surface/solid. The advantage is you can quickly and easily get a rather clean body to import into SOLIDWORKS. The disadvantages are a rarely perfect model, and a lack of any parametric features.
- If you design the model in Design X, it can be exported to SOLIDWORKS, and a feature tree will be made... I've had mixed results. Yes, it works. But, some features don't transfer. I found it best to extract profiles, surfaces, and other references from the model, then import only those into SOLIDWORKS. The biggest problem with this method is knowing ahead of time exactly what information will be needed to create the model in SOLIDWORKS.
Design X and other reverse engineering programs are fantastic, but they will not magically create a model at the press of a button. YOU need to be a 3D CAD expert. YOU need to know how to build the model. These programs will make you faster, but they won't make the model for you.

Sorry. This button does not exist yet.
-
Step 7: Results
The STL file contains 49,324 face
The STL file size is 12MB.

Simply importing the STL file into SOLIDWORKS and saving as a SLDPRT file give:
49,324 model faces
A file size of 28 MB

Remodeling the STL file as a parametric CAD model in SOLIDWORKS gives the following:
340 model faces
A file size of 1 MB (to get this file size, the imported data must be deleted from the SOLIDWORKS model. This means the model must be built without any reference to the imported geometry).

-
Step 8: Practice
Reverse engineering. Or rebuilding a model based on imported geometry is a valuable skill. Learn it now, before you need it. Like anything else, you'll get better with practice.
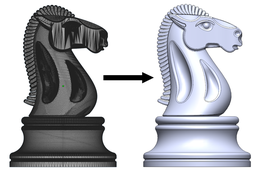
The chess knight model shown at the beginning can be downloaded here.

A handle for a refrigerator I converted from a mesh can be downloaded here.

The Gripper model can be downloaded here.

Another STL to NURBS conversion can be downloaded here.

Another STL to NURBS conversion is this face mask

