

CREATING AN AEROPLANE in CATIA

CREATE AN AEROPLANE IN JUST 11 EASY STEPS. THE STEPS ARE EASY TO UNDERSTAND WITH MULTIPLE PICTURES AT EACH AND EVERY STEP.
-
Step 1: Open CATIA
Open CATIA V5
Go to START--Mechanical Design--Wireframe and Surface Design.
- You can open "MULTI SECTIONS SOLID" if you want to create the model using surfacing, if you want to create a solid body for the model, you may go to part design.

-
Step 2: CREATE PLANES
Now you need to create multiple planes in the direction you want the body of the aeroplane to be in , take ZX plane for reference.
You can also take multiple points , this will also work.
Take the planes at distance you want the body to change shapes at.

Create the shapes according to the flow of structure you want.

-
Step 3: MULTI SECTIONS SURFACE
Select "MULTI SECTIONS SURFACE" and create surface of the various shapes you drew in the previous step.

The basic body of the Aeroplane is ready.
-
Step 4: CREATING FRONT SECTION OF THE PLANE
Select the XY plane and draw a profile for the front of the areoplane.

Now as you have drawn a profile accordingly, Revolve it around the Axis.

The front section of the plane is ready.
-
Step 5: CREATING WINGS
Take a plane at some distance from YZ plane(Atlease at the distance of the body, It can be more than it) and draw the profile you want the wings of your Aeroplane to take.
- Project the drawn profile on aerolane's body.

Take another plane at some distance to the previous plane you took in this step.
The plane must be at the distance you want your wing to be.
Draw a similar profile but smaller.
Take points on the new created sketch and on the projected image of previous sketch.
Draw a line between these two points.

Select "MULTI SECTIONS SURFACE" command And make a surface following the line as the spline.

Use "SYMMETRY" for wings on other side

Your Wings are ready.
-
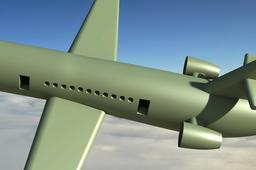
Step 6: CREATING WINDOWS AND DOORS
Make a plane and draw Doors and windows at the places you want them to be.

Extrude The Surface otwards.
Make a Symmetry On the other side or you may also draw , if you want some change in the layout of both the sides.
Now Trim The Extruded Surface.

-
Step 7: CREATING VERTICAL STABILIZER
Create a plane with respect to XY plane.
Sketch on the surface at the location you want your stabilizer to be at and project it on the body of the areoplane.

Create another plane and draw similar structure but smaller.

Create pionts on both the sketches and create a line.

Using "MULTI SECTIONS SURFACE" create a surface with both the sketches and line as refrence spline

-
Step 8: CREATING RUDDER
Using the same steps as while creating wings create Rudders on the Stablizer.
You can also create Rudders at other places on the body of Aeroplane.

-
Step 9: CREATING TURBINE
Take multiple planes according to the places you want the turbine of the Aeroplane to be at.
Create the profile you want the turbine to have.

Using "MULTI SECTIONS SURFACE" create Turbine

Take a Offset and create inner layer for the turbine

Create a plane Between the Turbine and the Body.
Draw a linking surface between body and turbine.
Extrude the profile "Upto the surface"

Create a Symmetry for the other side

-
Step 10: FILLING THE GAPS
Using the "FILL" command fill all the open surfaces


-
Step 11: FINISHING
Add colours to the surfaces if you want.
- Colours can be added by-----Right click on the surface----Go to properties----Change the colour


Click on OK.
