

Easy, Accurate Screw Thread Tutorial [Sweep Helix]

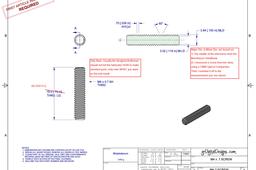
A basic Screw Thread Tutorial detail using (Sweep Helix). This example is using the few dimensions of a M4 x 0.7 6H standard screw. I keep this "3D Screw Template" in my files for anytime I need that screw (I just change the length and put the necessary head on top, or what ever). The basic steps used here can be used in any CAD software. Just a Minor Diameter and Thread Length, the "Tooth" detail with the Major Diameter, (run the Pitch, helix sweep), Then to clean up the ends, rotate a Chamfer sketch. Download my pdf files for an easy step-by-step tutorial (done in FreeCAD).
-
Step 1:
Create a cylinder equal to the minor diameter of the screw threads (you wish to make) and the length of the threads (you wish).


-
Step 2:
Create "tooth" shape at top of cylinder, putting the inner part of the tooth equal to the minor diameter of the cylinder (or attach it to the outside of the cylinder). Make the outer part of the tooth equal to the major diameter of the screw size. The two lines making the 60 deg. angle should be made equal. Do a Helix Sweep equal to the Pitch of the screw you are making and the length equal to the cylinder length + the "tooth" size (the vertical line in image below).


-
Step 3:
Create a "Chamfer" Sketch on a 45 deg. at both ends of the cylinder (attached to the Mn. D) and do a Revolve-remove (this will clean up the extra material the tooth-sweep created on both ends of the cylinder).

-
Step 4:
Save this 3D Screw model in your files as a template...
When ever you need this "screw size" for something, open it up, do a "save as" (to what ever) and put the Head detail necessary (or what ever), change the Thread length to what ever...
And there you go! Never waste time re-creating that screw size from scratch again.


