

How to 3D Print Jigs & Fixtures, Part 3: Advanced Features and Advanced Materials

Building on parts 1 and 2 of the series, this tutorial takes you through an ENTIRE agile design cycle for a real fixture we needed in our office, exploring the use of DFAM, advanced infill techniques to save printing time and finishing by going through a material selection process to print in one of the stiffest materials out there- Nylon 12 Carbon Fiber!
It's a total, soup-to-nuts, fixtures tutorial!
-
Step 1: Setup
In part one of this series, we talked about how to choose which of your Jigs & Fixtures might get the biggest boost from being 3D printed.
In part two of this series, we went over general principles for redesigning Jigs & Fixtures for 3D printing, including what order to redesign things.
Now in part three, we're going to actually put those steps into practice:

We're not a factory here at the GrabCAD offices, so it was hard to find something we needed a jig or fixture for, but then I saw this J750-printed part that I would have to polish every time I printed one:

We use that model for a lot of demos, and every time I print a new one, I'll have to hold it down on a table and give it a polishing to get that clear, glossy shine. It's not impossible to hold it down by hand, but it does get a little squirrely, and it would be handy to have a fixture to help me out.
And going through an agile design cycle from start to finish on this fixture taught me a lot, which I thought readers might learn from as well.
Let's get started.
-
Step 2: Our first (UGLY) fixture attempt
When doing agile design on something you've never made before, your first prints should have one goal: REDUCE THE GREATEST RISK YOUR DESIGN HAS.
Every design is a step into the unknown, and there's no reason to work on refining small aspects of your design when there's a big pitfall right in the middle. Starting my tail light fixture from scratch, my risks were:

Obviously, the cutout in the fixture has to be a little bigger than my part for it to slide in easily, but how much bigger without being too loose? 0.005 inches? 0.010 inches? More?
And while our automotive Jig & Fixture customers use heat set inserts all the time, I had never used one in a print before. I had heard there was some procedure to strengthen the FDM contours around the insert so it didn't pull out, and sizing that was totally new to me, so I counted it as a second big risk.
So instead of spending a lot of time optimizing a design for 3D printing, I did what many new customers do when making their first fixture- just print a block that gets the job done:

Because I was printing at 0.010" layer height on my F370 printer, I left 0.010" (or one layer) clearance between the outside radius of my tail light and the inner radius of my fixture to give it loose, workable fit:

After 5.5 hours I had my printed part and found this design had some pros, but also some big cons:

Even though there are a few cons, I consider this a win for a first iteration: in just a short time, we eliminated the two biggest risks to my project:
- That my work piece wouldn't fit in my fixture after printing, and
- That the holes for my heat-set inserts would be the wrong size (more on this later).
And this took just 1 hour of work in SOLIDWORKS, and then I sent the part to print overnight while I did other things.
If I was SUPER pressed for time, I could just throw that fixture on the shop floor and have people start using it right now, but just look at it: it's blocky, not ergonomic, and typical of how fixtures are hastily designed when we have to cut them out of wood or metal. We can do better.
So for round two, we did some Design For Additive Manufacturing (DFAM).
-
Step 3: Our second, DFAM-ed fixture attempt
Going forward, we had some debate about how to optimize material usage and make this fixture more ergonomic for operators (me) to use.
We knew we probably wanted big cut outs, to use material to only where it was needed. And we knew we wanted it curved, with many grip points, to make it more ergonomic.
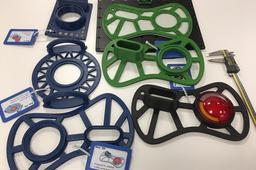
So I and our two winter interns brainstormed some redesigns on the board but they all looked equally plausible:

It could be that design A, with its circular shape and half-moon handles, might be easiest for operators to grip. Or maybe design C, with its ergonomic outer shape and single handle near the left-hand fist, might be easier to hold stable.
(Remember what we said in part 2 of this series: when 3D printing a jig or fixture, only a few critical faces have to be in a certain place. EVERYTHING else is up for redesign.)
We could have stared at this whiteboard for an hour, making competing cases why each was best, but the truth is we didn't know. So we did something a lot of new printer users are often scared to do for some reason: we just printed them both.
I had our short-term intern Tahina (best luck at MIT, Tahina, happy travels!) model up design A, and I modeled up a hybrid of designs B and C, and we had a good, old-fashioned design contest.

Once again, we had a big unknown (which type of ergonomics would be better loved by operators?) so we used 3D printing to fill in that unknown. The bigger risk here was in spending days pursuing the wrong idea, not in spending another 5 cubic inches of material.
After printing them both (overnight again, to not lose any work hours), in the morning the limitations of each design became obvious:

Each design could be optimized further with this new knowledge, but the bigger point here is: if you don't know how a fixture will feel or work, just print it (with a sparse infill) and find out! That's better than not knowing!
We decided to go forward with the hybrid B/C design since it was more ergonomic, and let's look at some of the other little DFAM touches I used in it, based on my previous tutorial:

Those are some of the common, little things anyone can do, to make your fixtures more printable.
But to take your tool strength TO THE NEXT LEVEL, let's look at some ADVANCED FDM features.
-
Step 4: Our third attempt, using Advanced FDM features
I printed my version 2 design in sparse fill, to save material and printing time, which meant inside the part, the infill looked like this:

I stopped the print early (because I was running out of material and I also wanted my part NOW), so you can even see this sparse fill in real life:

It's putting contours around the outside, but leaving the interior of my part light but not very strong (as intended for that setting).
I can actually feel this weakness handling my part, but to show the rest of you, I ran a quick FEA of my most likely failure mode:

Now, if I wanted to make my fixture stiffer in that direction, I could redesign everything (more risk) or increase infill density across my ENTIRE part (wasteful of material AND printing time).
It's better to put extra infill EXACTLY where I need it, and GrabCAD Print has a new feature called Advanced FDM which lets me do just that. Advanced FDM can do this because of the difference in how GrabCAD Print sees your part:

Because we're pulling in all that CAD information directly, we can do advanced things in our CAD system to better prepare models for printing. I went back into SOLIDWORKS and added stiffening bodies to act as internal I-beams and extra fillets to give me more faces to work with:

Those purple shapes are separate, non-overlapping bodies INSIDE the same CAD file as my fixture. I had to do booleans in SOLIDWORKS to cut their previous volume out of the rest of the shape.
And the fillets are just fillets.
What this lets me do is select those fillet faces in GrabCAD Print to put more infill just behind them, and print those stiffener bodies at a different density than my overall fixture, letting me have an infill that looks like this:

We could even strengthen ALL the fillets and have the stiffener bodies be LESS filled than the normal volume, to save weight maybe:

And there are a hundred more ways to strengthen/lightweight/optimize the infill in this fixture.
But the main point is, now we can control exactly WHICH faces and bodies have extra infill, in a matter of minutes, using CAD-like intelligence. That sort of fine control would have taken me an hour to do in Insight, our older print-prep software, and wouldn't have been nearly as smart.
(Also, Advanced FDM is free for ANY GrabCAD Print user to use, but only works on certain Stratasys printers. Click here for more information about this new mode!)
Any GrabCAD Print user can turn on Advanced FDM mode in their preferences:

And changing the infill of a body or face is as easy as using a slider:

In my actual version 3 print, I used the stiffening bodies to add material, and beefed up my fillet infills to help out too, and the result looked like this:

To make it a little more obvious:

And we can do this in ANY combination we want. That's advanced FDM.
I can tell you that this new, revision 3 of my fixture was definitely stiffer than version 2 (mostly because of the new bodies), but we can do even better.
To make this fixture EVEN stronger and stiffer, we have to dive into advanced materials.
-
Step 5: Our final print- using Advanced Materials!
Choosing a material for your 3D print can be tough. In just the Stratasys line, there are nearly 20 different types of FDM thermoplastics available, and other companies have even more.
If you wanted to see which of those 20 materials was best for your fixture, you'd have to go to 20 different pages on our website, download 20 different material sheets, compare 20 different sets of engineering properties and numbers and costs, etc.
Don't worry, I've done it for you.
Let's start with the material the majority of our customers use, ABS:

With a yield strength of 31 MPa (x axis) and a flexural modulus (i.e. stiffness) of 2100 MPa (y axis), ABS is a good, middle-of-the road, starting material. Most of our customers print most of their early designs in ABS.
In the same performance range, there are a few other "prototyping plastics" in use for early designs, ASA and PLA:

You can see PLA is stronger than ABS (it's further to the right) and even a little bit stiffer, but it's also a lot more fragile (1/3rd the impact toughness). But PLA is still popular in the Educational and Hobbyist space because it's half the cost of ABS, letting students print a lot more for their dollar!
ASA is very close to ABS in strength and stiffness, and tends to produce smoother parts and holds up better to UV light (sunlight)- so it's become our "go-to" material in the Boston office! All the versions of the fixture you've seen so far were printed in ASA.
Those are some of the basic prototyping plastics, but let's get a little tougher, with some Production Grade materials:

These materials are generally tougher (higher impact resistance) than the prototyping grade plastics, so customers use them for things that have to last, like fixtures on the shop floor. Flexible Nylon 12 is used for handles and grips and parts that get kicked a lot, PC is used for higher temperature fixtures, and PC-ABS is when you want a mix of PC strength and ABS toughness.
But let's get even STRONGER, with some High Temperature Materials:

Ultem 9085 passes Flame, Smoke and Toxicity (FST) tests, so can be used inside automotive and aerospace cabins, and Ultem 1010 is nearly twice as strong as ABS, with much better heat resistance, so customers have used it in aerospace, food prep machines, and even tanks (both the liquid and military kind)!
Want to get even STRONGER? There is one last class of materials Stratasys just introduced, mainly for Aerospace applications:

Antero 800 NA is so strong it's actually off the chart (93 MPa) and although it's good for aerospace and satellite applications due to great strength-to-weight and low outgassing, not a lot of people are using it for fixtures (due to cost).
So to print our fixture, we've got a wide range of strengths, from ASA up to Antero 800 NA, but I bet some of you are wondering why there's so much empty space left at the top of the chart, or why I made my stiffness axis go all the way up to 10,000 MPa.
Well, I wanted my tail-light polishing fixture to be as stiff as possible. And I really wanted to print for the first time in a material that had chopped-up carbon fibers inside it.
So I'm going to throw our Nylon 12 Carbon Fiber on this same graph we've been using, and see if you notice anything different about it:

All the other FDM materials have stiffnesses in a band from 1000 to 3000 MPa, but then Nylon 12 CF struts in, at nearly 5 times the stiffness of ABS!
That's why a lot of our customers in high-end racing and outdoor sports use it to replace metal on their designs early in the prototyping process, and that's why I wanted to print my fixture out of it.
(As an added bonus, Nylon 12 CF also has good Electro-Static Discharge (ESD) properties, so some of our aerospace customers who have sensitive circuit boards going on satellites use Nylon 12 CF to make fixtures for them as well!)
To learn more about the properties of Nylon 12 CF, click here.
In GrabCAD Print, printing in Nylon 12 CF with my existing Advanced FDM stiffening bodies and fillet infills was as simple as changing one drop-down menu:

I printed my fixture on our local Fortus 450 with no other changes. And when the part came off the machine in the morning, I REALLY couldn't bend the thing- it felt like a true metal replacement:

So I'm really happy with this design now. It's strong, stiff, ergonomic and efficient.
Let's review everything we did to get this fixture to where it is.
-
Step 6: Review
What we went through is the process anyone could follow, to optimize your factory-floor tools for 3D printing:

First, we used CAD tools (SOLIDWORKS, in my case) to change our blocky, traditionally manufactured design into something ergonomic, efficient, and designed for additive (such as removing overhangs that would waste support material).
Then, we used GrabCAD Print's Advanced FDM tool (free to all users, but only for certain printers!) to put infill EXACTLY where we needed it. Right now, most customers use Advanced FDM to make certain bodies and faces STRONGER than they normally would be, but you could also make your part LIGHTER in very specific, controlled areas too.
And finally, we looked at all available materials and chose the coolest and stiffest possible one, Nylon 12 Carbon Fiber, to make our fixture as stiff as an aluminum one might be, but only much, much lighter!
Hopefully this gives new engineers an idea of how to optimize your Jigs & Fixtures for 3D printing, and if you'd like even MORE help from Stratasys engineers making your shop-floor tools lighter, cheaper, and easier to use, request a private consultation here!
(This is the end of the required reading for this tutorial. If you want more info specifically on the heat-set inserts I used in version 1 then forgot to put in the later versions, read on...)
-
Step 7: Addendum: Heat-Set Inserts
So you may remember one of my biggest risks was not knowing how to change my printed part for heat-set inserts way back in version 1:

The reason this was a risk, is because if you want to have a 1/4" screw holding your fixture down, you CAN'T put just a 1/4" hole in your 3D printed part. You actually have to make the hole BIGGER, to accept the 1/4" heat set insert, which will then accept the 1/4" screw. So that's one sizing issue.
Secondly, it's best practice to add extra contours INSIDE your FDM part, to give extra material and strength for the insert to 'grip' the model more securely. This is something experienced operators know how to do, but for newbies like me, it might be intimidating.
Luckily, this is a feature in Advanced FDM too:

Using this auto sizing, not only does Advanced FDM correctly change your CAD dimensions to accept a standard insert, it also puts in those extra infill contours. If I stopped a print halfway through, it would look like this:

Those extra green contours around the holes give more material for the insert to 'push into', when you force the metal in.
And how do you heat up a heat set insert to go into your FDM part? I learned from a co-worker: you just use a soldering iron!

This was actually so much fun, I gathered whomever I could find in the GrabCAD office to have a try, including two interns and my boss!

So even though we didn't end up needing screws or bolts to hold my final fixture down to a work table I wanted to include this part as an addendum, to let people know, one of the previously most intimidating things about adding inserts to your FDM part (sizing and contours) are now done automatically for you, by GrabCAD Print!
Now you too can easily add inserts to your FDM parts, with just a few simple tools:

Hope this helped! If you need any more information on preparing jigs & fixtures for FDM printing, comment below, click here, or email me directly at shuvom@grabcad.com!
