

How to create a Square to Round (Autodesk Inventor)

This tutorial will run you through the process to create a sheet metal square to round from start to finish. Including flat pattern.
-
Step 1: START!
Start by creating a SheetMetal.ipt

Or you could select Convert to Sheet Metal in the 3D Model Tab, if you already started a Standard.ipt

Make sure you have the correct thickness for your square to round. You can check/change this by going to the Sheet Metal tab, and selecting on Sheet Metal Defaults.

-
Step 2: Creating Square
Start by creating a 2D sketch on XZ Plane.

Once you started the sketch go to the Sketch Tab select on the Rectangle drop down and select Two Point Center.

Select the Origin Center Point then drag the rectangle out a bit and left click.

Give rectangle some dimensions. (My units are set to inches)

Now you can select Finish Sketch.

Or you can right click, and select Finish 2D Sketch.

-
Step 3: Creating Round
Start by going to the 3D Model, or the Sheet Metal Tab and selecting on the Plane drop down. Now select on Offset from plane.
This will give us a work plane parallel to or selected plane at a specified offset distance. Being our height of the Square to Round.

Select on the XZ Plane

Now give your model a specified height.

Start by creating a 2D sketch on the work plane you created.

In the Sketch tab select on the Circle using a Center Point.

Now Select the Origin Center Point, and drag out circle.

Give circle a specific diameter.

Now you can select Finish Sketch.
Or you can right click, and select Finish 2D Sketch.
Or you can go ahead with the Lofted Flange Feature, but in this tutorial we will use Finish Sketch.
-
Step 4: Creating Lofted Flange
Go to the Sheet Metal tab, and select on Lofted Flange.
This feature will create a flange feature or new body between two input profile sketches. Ours being our circle, and square.

Now you can start by selecting to profiles.
Select on the Square as Profile 1

Now select the circle as Profile 2, this will then generate a visual representation of your model. If this doesn't show up click on the check mark box next to the glasses in the dialog box.
Select OK

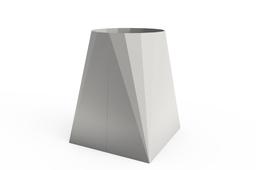
Now you should have a model that looks like this. Now there is one more step we need to do in order to make this be able to be a flat pattern.

-
Step 5: Creating a Rip
Go to the Sheet Metal tab, and select Rip.
Rip will remove material allowing a closed model to be flattened.

First select a Rip face. (Can be any surface on the model)

Now select the Rip point.

You're done!

-
Step 6: Creating Flat Pattern
Go to the Sheet Metal Tab, and select on Create Flat Pattern

BAM!!! Flat Pattern

If you want to get out of Flat Pattern just go to the Flat Pattern Tab and select on Go to Folded Part.

-
Step 7: FINISH!

