

How to create different kinds of roof in Renga Architecture? From simple to complex

The roof is the main attribute of any house, and especially of a private country house or cottage. It is not only designed to protect it from rain, snow and sun, but is also an ornament of the house and street, attracts the attention of neighbors and passers-by.
In Renga Architecture, the Roof tool allows you to build different roof models using a small set of commands. But at first sight it is not always clear how to make it in one form or another. Therefore, we decided to tell about the different nuances of working with this tool on the example of several country houses - from simple to complex.
-
Step 1:
The simplest thing in Renga Architecture is creation of a 4-sided gable Dutch Hip roof. There is no need to change any parameters, the roof is built on points continuously (Figure 1).

-
Step 2:
To create it, set the edge Parameters once (Figure 2) and specify 4 points in the corners of the building on the 3D View.
The construction of the roof is always completed by pressing the ENTER key or by combining the first and last points.
-
Step 3:
The following examples will clearly show that the roof in Renga Architecture always cuts all the objects that are under it.
Indeed, in most cases everything should be hidden under the roof. However, there are exceptions, and we'll tell you how to make the chimney or ventilation shaft rise above the roof.
Around the chimney, which we created in Renga Architecture by using Wall tool, we need to create an Opening. The depth and level of this opening must be such that it cuts the roof and the opening at the same time. These parameters can easily be determined by inserting a cut into the drawing and the linear dimension (Figure 3).
Perhaps, there are no more tricks for constructing such kind of the roof.

-
Step 4:
So we turn to the construction of a shed roof (Figure 4). This type of roof is built a little more complicated in fact.
To build a roof of this kind, you need to know in which direction the slope will be directed. In our case, the slope is directed towards the axis 2.

-
Step 5:
Therefore, we begin the construction from the point Б:2 (Figure 5), in the parameters of the edge we choose the Single slope shape and the 15 ° slope. Then we specify the point A:2, and after that we change the shape to the Gable and put the points A:1 and Б:1. Fix the roof, as always, with the ENTER key.
Of course, you can specify the points in a different order, most importantly, do not forget to change the shape of the edge to which the roof is inclined, to the Single Slope. But if you still forgot, then there is the possibility to edit the roof edge using its hot point. In this case, the phantom image will immediately show whether you are doing everything correctly.

-
Step 6:
We will complicate the task and build a roof, as in Figure 6. We must immediately stipulate that it is created from several objects. Let's start with the most complicated roof. The first thing you need to understand: it's a gable roof, but there are not four edges, but five.
This is done in order to build a separate room above the garage, but the roof must cover the staircase.
The roof is not simple and therefore, in order not to make mistakes with the snaps, we will build it on 2D with viewing the result in 3D.
We will place them in different tabs.

-
Step 7:
So, in the steps:
1. Go to the Second Floor tab, select the Roof tool and set the offset to 2000 mm in the Parameters.
2. In the edge parameters, set the Single slope shape and the 45 ° slope.
3. Specify the B:1 and B:5 points.
4. Change the shape to the Gable and specify B:5 point.
5. Again select the Single Slope shape and change the slope angle to 30 °.
6. Specify the Б:2 point.
7. Change the value of the Overhang to 3300 mm and fix B:1 point. The slopes are ready.
8. Select the Gable shape in the list and reset the value of the overhang.
9. Press the ENTER key.These steps are shown in Figure 7.

-
Step 8:
To build a flat roof over a room is quite simple, for all segments of such a roof the shape of the Gable is given.
In other words, you just need to change the shape of the edge from the Single Slope to the Gable in time and use the overhang correctly, and you can get the most original roof shapes. -
Step 9:
In the last example (Figure 8), we'll look at how to create a composite roof over the house and a roof with a dormer window above the garage.

-
Step 10:
So, in Figure 9 it is demonstrated that the roof over the house actually consists of three separate roofs. In this case, only the conical roof for the reader is new.
It is constructed, like the circle, by two points, you only need to specify the slope angle in the parameters.

-
Step 11:
If roofs intersect, then they will actually form a single roof in Renga Architecture. This can be seen if you hide one of the roofs or look at the roof from the inside (Figure 10).

-
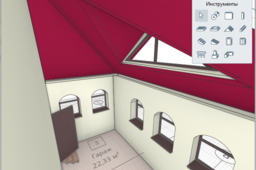
Step 12:
We proceed to the roof over the garage. Here we first see the dormer window. In Figure 11 we showed a view from the garage
The roof consists of two roofs - a hip roof and a small gable roof, which forms a dormer window.

-
Step 13:
Let's specify that in Renga Architecture windows can be inserted only into walls, so we select the Wall tool and set its parameters.
We build the wall exactly at the intersection of two roofs, and after that we insert a window, suitable in shape and size. -
Step 14:
We hope our examples have convinced you that it's easy to work with roofs in Renga Architecture, and the tool from developers of the program turned out really flexible and convenient.
Read our Blog in Russian (http://rengarnd.blogspot.ru/2017/05/blog-post.html)
