

Matte or Glossy? Which Finish to Use for Your 3D Prints and When.

Matte or Glossy? That is the question.
PolyJet users often ask themselves whether they should print a part with a matte finish or a glossy finish.
And not without reason. The type of finish can totally alter the look, feel, color, and even strength and durability of two otherwise identical parts. Each option has its own benefits and implications that need to be considered.
In this tutorial we will give an overview of matte and glossy, compare the pros and cons of each, and offer examples that clearly show what each finish type has to contribute. Finally, we will wrap up with a quick breakdown of when to use what.
-
Step 1: What are Matte and Glossy?
Matte and Glossy are the two finish options in GrabCAD Print.

Matte and Glossy are both made of the same material. The difference is that for a glossy finish, the model is exposed to air during curing. While for a matte finish, the model is covered in support during curing.
-
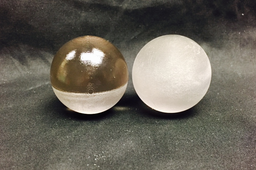
Step 2: Matte Finish
Matte finish is non-reflective and somewhat rough to the touch.

Matte part before support removal (left) compared to matte part after support removal (right).
-
Step 3: Glossy Finish
Glossy is shiny and smooth.

Glossy part before Support removal (left) compared to glossy part after Support removal (right).The bottom portion of this part cannot be printed in glossy because it needs Support material. More on that below.
-
Step 4: Support Material
Only matte finishes can have Support material.
Any part feature with an angle of less than 90° (also called a negative angle) will be covered in support material, which will result in a matte finish. Any feature with 1° of overhang (or more) will need support as well, and so will also be printed in matte.
If you need to print a part with full Support material, it will need to be fully matte.

-
Step 5: Uniform Finish
Because of the Support material consideration mentioned above, there is no such thing as a part that is entirely glossy. Glossy models will include some matte sections, along with a visible transition line between the glossy and the matte.
Even a part without negative angles or overhangs will have a layer of matte on the bottom where the part comes into contact with the tray. You can process matte finishes to make them glossier when necessary – but, if your part really needs a uniform finish, print it in matte.
You can also try sectioning the model into separate shells that will be orientated on the build tray in a way that minimizes matte surface. After printing, you can assemble the multiple shells into one part.
Example 1: Parts that require glossy are facing upwards on the tray


example 2: No matte surface whatsoever after assembly


-
Step 6: Sharp Edges
Matte is ideal for sharp edges and angles. Glossy parts get rounded edges during the printing process due to the absence of Support material. So use glossy for smooth surfaces and a nice glassy finish, but use matte instead when you need sharp, unified corners and edges.
-
Step 7: Details and Fine Features
As an extension of the point above, matte is better for fine details and highly specific size requirements.
-
Step 8: Strength
Printing in glossy makes the overall part stronger.
-
Step 9: Cutting Costs and Time
Glossy takes up less time and material, and is therefore the ideal choice if none of the other circumstances make much of a difference.
-
Step 10: Example I- Extruding Pins

Pins are typically thin and need a smooth surface. Pins printed in glossy are stronger than pins printed in matte because the smoother surfaces mean less stress risers. Also, there is almost no need for Support material removal, which can break off fine pins with its high-pressure water spray.

Here is the same shape printed in matte. Notice that the corners are sharper and the shape is more true, but the walls are rougher because of the interface with the Support material. Also, see all the small defects on the sides. The rough surface may provide a more accurate, uniform surface, but it also leaves a rough finish with small defects that can act as stress risers and concentrate stress to specific portions on the part. This compromises the strength of the part and increases the risk of breakage.
-
Step 11: Example II- Parts with Holes

Here is a part with holes that was printed in both matte (left) and glossy (right).
The surface of the part on the left is more uniform. The part printed in glossy on the right has an inconsistent surface due to the support material that needed to be applied.
So for any part with apertures that needs to be uniform, you’ll probably want to use matte.
-
Step 12: To Sum It All Up
So which finish should you use? You’ll need to weigh each decision on a case by case basis, equipped with this information about each option. That being said, there is a basic framework you can follow which we’ll list below.

Hope this helps. You can check out this tutorial to see more about polishing by hand, or visit the Stratasys support center for more information about materials.
