

Solid Edge Tutorials | How to use Lip or Groove feature for Plastic Design

This Tutorial show How to use Lip feature for Plastic Design in Solid Edge
FOR MORE tutorials, please visit: https://www.youtube.com/c/CADCAMLearning?sub_confirmation=1
-
Step 1: How to Creates a lip or groove on a part
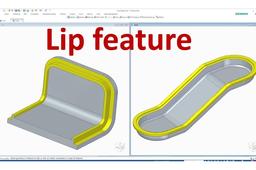
Creates a lip or groove on a part. You can specify whether material is added to form a lip, or removed to form a groove. The cross section shape cannot be changed. Only the dimensions that control the size of the rectangular cross section can be modified.
Video show Creates a lip or groove on a part
-
Step 2: Selecting edges

The first step in adding a lip or groove feature is to specify which edges to add it to.
You can select the edges individually, or you can select a chain of edges. The edges must be connected.
-
Step 3: Defining the shape and direction
After selecting the edges, type the feature height and width in the command bar
boxes. A dynamic representation of the feature is displayed. Move your cursor until
the lip or groove is in the position you want, then click.

