

Solid Edge Tutorials | How to use Rib command

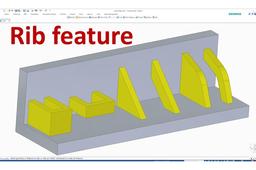
This tutorial show How to use all of selection of Rib feature in Solid Edge
FOR MORE tutorials, please visit: https://www.youtube.com/c/CADCAMLearning?sub_confirmation=1
-
Step 1: How to use Rib feature
Video tutorials show how to use Rib feature
Constructs a rib by extruding a profile. The Direction and Side steps allow you
to control the shape of the rib.

Constructing a synchronous rib feature
When you choose the synchronous Rib command, the command bar guides you
through the following steps. The Rib command requires an existing sketch.
-
Step 2: Select Step
Select the sketch elements that define the rib feature
-
Step 3: Rib Thickness Step
On the dynamic edit box, type in the rib thickness value and press the Tab key
-
Step 4: Extent Step
Option to extend the ends of the sketch elements until they intersect the part
-
Step 5: Finite Depth Step
Option on–Sets the rib extent so that the sketch elements are projected a specified distance to either side of the profile plane. (The rib does not project all the way to the existing faces on the part.)
Type the distance in the value edit box. Option off–Extends the faces on the rib that are perpendicular to the sketch plane to the existing faces on the part.
-
Step 6: Alignment Step
Define the side of the sketch to create the rib on
-
Step 7: Side Step
Use the steering wheel to define direction for the rib
-
Step 8: Finish Step
Click the Accept button to create the feature
