

Tutorial - creating a swep using a path and a guide curve

Tutorial
-
Step 1:
This tutorial will explain the difference between the options follow path and follow path and a 1st guide curve in the sweep feature. We have here a profile that is a triangle and straight line as a path and a curve line as a guide curve

-
Step 2:
We activate the sweep feature and the property manager opens on our left side asking us to select the profile, path and a guide curve.

-
Step 3:
Under the options in the sweep feature we can see something called orientation/twist type, and our orientation is follow path

-
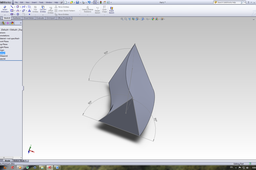
Step 4:
We have our part made.

-
Step 5:
Go the design manager tree and right click on the annotations and activate show reference dimensions.

-
Step 6:
We can see the dimensions of the angles between the lines connected to the path and the profile.

-
Step 7:
If we edit this sweep and under the orientation/twist type change the follow path to follow path and 1st guide curve,

-
Step 8:
We get the same angle as on the starting profile and we can see that the part has a significant twist. The difference is that when you instruct SolidWorks to use follow path and 1st guide curve you are telling him to twist the profile along the path so that this angle stays the same

