

Tutorial: How to import sketches in Autodesk Inventor?

Tutorial.
-
Step 1:
Create a new part.

-
Step 2:
Click on "image".

-
Step 3:
Browse and search for the image. Click open.

-
Step 4:
Click on "dimensions".

-
Step 5:
Dimension the sketch. Click finish.

-
Step 6:
Select yz plane from the browser and invoke a sketch on this plane.

-
Step 7:
Click on image.

-
Step 8:
Browse and open the required image.

-
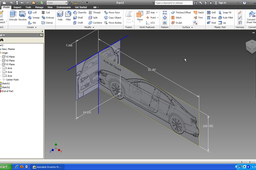
Step 9:
Click on line command and make two axes as shown in the below figure.

-
Step 10:
Click rotate.

-
Step 11:
Select centre point as the line. Fill the angle to rotate. click ok.

-
Step 12:
Click "done"

-
Step 13:
select the fix constraint and constrain the lines.

-
Step 14:
Click on dimensions.

-
Step 15:
Edit dimension. Ok.

-
Step 16:
Use colinear constraint if required to position the image.

-
Step 17:
Finish the sketch.

-
Step 18:
Similarly import rest sketches.

