

Tutorial: How to model a hexagonal bolt in Autodesk Inventor?

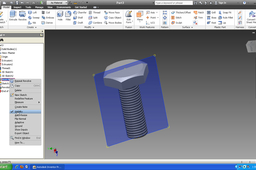
Tutorial to model a bolt in Autodesk Inventor.
-
Step 1:
Invoke a sketch in Inventor and make a polygon with 6 sides i.e., a hexagon.

-
Step 2:
Finish the sketch.

-
Step 3:
Extrude the profile to a certain limit

-
Step 4:
Click OK to finish extrusion.

-
Step 5:
Right click on this plane and invoke a sketch.

-
Step 6:
Sketch a circle->finish sketch

-
Step 7:
Extrude it. Click OK to finish.

-
Step 8:
Click on thread.

-
Step 9:
Select the lateral face of the bolt for thread profile.

-
Step 10:
Click on specification. Select ANSI Metric M profile or any other as per your requirements.

-
Step 11:
Select the thread designation. Click OK.

-
Step 12:
Plane->midplane between two parallel planes.

-
Step 13:
Select the planes as shown.

-
Step 14:
Invoke a 2d sketch on the plane.

-
Step 15:
Select Line.

-
Step 16:
Sketch a triangular profile and a line passing through the middle. Finish sketch.

-
Step 17:
Select revolve.

-
Step 18:
Select the appropriate parameters.

-
Step 19:
Click OK.

-
Step 20:
Hide the plane.

