

Tutorial: How to save time with Bolts, nuts, washers in Auto desk Inventor.

Answer
-
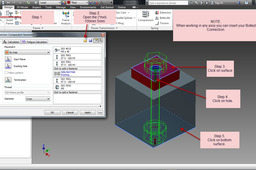
Step 1:
You will need to be in assemble for this, Go to the Design tap in your ribbon and click on Bolted Connection.

-
Step 2:
This will open up a box with, you can pick what method you want to use to create this bolted connection....
Linear?
Concentric?
On point?
By hole....
This is much like creating a hole on an IPT...
I have picked ' By Hole ' for this tutorial.
-
Step 3:
1. Start plane
2. Click on top surface
-
Step 4:
1. Existing hole
2. Click on hole
-
Step 5:
1. Termination
2. Click on bottom plane
-
Step 6:
Click on 'Add fasteners'

-
Step 7:
Pick what you need.

-
Step 8:
Working your way down by picking what type of
Bolt, nut, washers you require.
-
Step 9:
Click on save Icon..
This will allow you to export the (*mxl) file
Type the file name (( what ever will suit your Bolted Connection ))
100mm 5mm???
Save to any where you want on your computer....
-
Step 10:
If you want to insert your new bolted connection back in to your assy
1. Design Tap
2. Bolted Connection
3. Open folder
4. Select (*mxl) file
5. Click on your the top surface
5. Click on hole
6. Click on bottom surface
