

Tutorial - How to sketch a Cosine wave in Solidworks 2014

Here are the steps to sketch a Cosine wave and then use Swept cut to create a nice wave pattern.
-
Step 1:
Start a sketch in a part file, then select spline in sketch tools, use drop down tools select "equation driven curve". Use "parametric" under equation type in the side manager.

-
Step 2:
In this example I will these variables to sketch the Cosine wave, under parameter variables use t1 = 0, t2 = 3.28 this defines the total length of wave. under equation variables use Xt = (cos(t*8))/12, Yt = t. *8 is equal to frequency. /12 is equal to amplitude divided by 12. You can experiment with difference variables to suit your needs.

-
Step 3:
The Cosine wave starts at the origin, so let's move the wave in X and Y to better suite our needs. in equation Xt add .92 + in the beginning, then Yt add 3.375 + in the beginning as shown in image below.

-
Step 4:
Now that the Cosine wave is complete, we can do a swept cut by using a another sketch that is rectangular shape that is normal to the Cosine wave sketch.

-
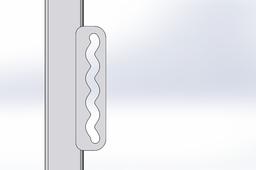
Step 5:
Now we have a complete swept cut and I've added a radius at the ends. Done!
other variations is a Sine wave or other equations to suite your particular needs.

