

FUSION360 Configurations Tutorial for parts insertion into design

Turn a model into a configurable model so when you go to insert the part into a design, it will give you a menu where you can select the specific plug from a single file without having 10 individual plugs floating around in a folder :)
Things I use this method for: Batteries of varying mAh, screws and standoffs of varying length, plugs, sockets, IC's, etc.
-
Step 1: Combine into single design

-
Step 2: Create Configuration Table


-
Step 3: Add Aspects

- After creating a configuration table, you should automatically enter the "Add Aspects" window

- If not, you can click "Add Aspects" in the configuration table at any point

- Right click each component and select the "Suppression" checkbox
- Each instance of "Suppression" will create a new column in the configuration table
-
Step 4: Add Configurations

- Exit Configuration Mode


- Rename the configuration
- Try to keep it short and sweet as the columns cannot be expanded at the moment
- It helps to copy the name so you can paste it when renaming the next configurations

- After creating and renaming configurations, I like to include on that shows all configurations.
-
Step 5: Activate and Suppress

- Right click and Activate a configuration (2 pin for example)

- Go through each configuration and uncheck all suppression aspect columns (uncheck all but 2 pin for example)
- Continue this process for all configurations
-
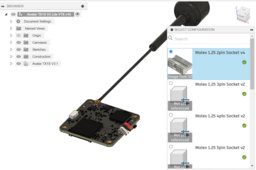
Step 6: Insert into Design

- Go to target design workspace and open file location of configured design.
- Right Click on the configured design and select "Insert into Current Design.

- A "SELECT CONFIGURATION" window will appear.
- Select the configuration/component you wish to insert into design
- Press "OK"
- Drink water, you probably haven't had enough today.
