

How to Insert Metal During an FDM 3D Print Job

If not done right, metal that is inserted in FDM parts can look sloppy and unprofessional. With a few easy steps, a metal part can be inserted seamlessly and damage-free.
-
Step 1: The Challenge
It is well known that an FDM build on a Fortus system can be paused and a metal object inserted into the part. The challenge is to properly adhere the Fortus plastic to the metal after the build is resumed. There are mechanical and chemical differences between metal and Fortus plastic that prevent adhesion.
At a recent Stratasys conference, one of the attendees was showing an FDM part that had a metal insert in it. One of the Stratasys applications engineers noticed that the plastic layers directly above the metal looked sloppy.

After closer inspection, he realized that the tool paths had not adhered to the metal at all. At best, the tool paths had stretched across the space at different points. It was many layers above the metal before enough material had accumulated for the part to take proper shape again.
-
Step 2: The Solution
Since the FDM build process starts out every time on a clean sheet of acrylic, to fix the problem, one needs to somehow coat the metal with acrylic and the Fortus plastic should adhere to it. After some experimentation, it was determined that one needs to coat the metal with an acrylic spray before you extrude Fortus plastic over it.
To perform the process, one must understand the following:
- FDM parts can contain a metal object as long as the metal object has a flat and true top horizontal surface when inserted.
- While processing the part in Insight software, it is necessary to manually remove the support tool paths from the cavity where the metal inserts into the FDM part.
- When processing the part in Insight software, it is possible to insert a “pause” in the build process at the layer that is on the same plane as the top surface of the metal part.

The acrylic treatment of the metal part is relatively straight forward.
Step A. It is recommended that the metal insert first be wiped clean using a degreaser and soft cloth. The degreaser used in experimentation was PPG’s Acryli-Clean DX 330.

Step B. Once clean, set the metal insert face up on a piece of cardboard in an area that is clean and dust free.
Step C. Spray one coat of acrylic on the metal and let set for 5 minutes. A second coat is suggested, setting for another 10 minutes. The acrylic spray used in experimentation was Rust Oleum – Painter’s Touch – Multi Purpose Paint - # 1901 Clear Gloss Acrylic.

TIP: A few drops of cyanoacrylate (typical super glue) aids in preventing movement of the metal part after the build resumes.
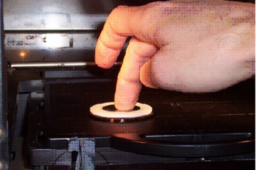
Step D. At the time of build pause, open the door of the Fortus system and place a few drops of cyanoacrylate on the plastic surface that will interface with the metal object.

Step E. Immediately insert the metal object into the cavity and apply pressure for a few seconds while the cyanoacrylate sets.

Step F. Wait 2 minutes for the metal insert to warm up and resume the build.
Step G. Once resumed, you will find that the Fortus plastic will extrude seamlessly over the metal surface, laying down perfect beads of road and raster.
-
Step 3: Using GrabCAD Print
You can also insert a pause in a print job using GrabCAD Print software by following these instructions.
-
Step 4: The Result
Stratasys applications engineers discovered that Fortus plastic will extrude seamlessly over metal surfaces laying down perfect beads of road and raster if the metal is first coated with acrylic. The result is adhesion never before possible.
