

More Keyshot and Photoshop Tips

I don’t think of myself as an expert in Keyshot or Photoshop, but I can often get some decent results from both programs. My biggest hurdle sometimes is simply remembering the process I typically use.
This article is being created as a tutorial for you, and a reference for me if I forget a step.
I have another tutorial on Keyshot you may also enjoy: Some Keyshot Tips
-
Step 1: Choose something to render
Working with your own model is great, but sometimes you might just want to render something without the associated hours of CAD work. In that case, pick something interesting from the library.
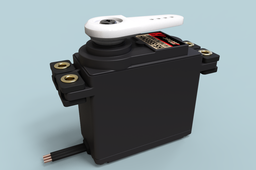
I’ve selected this Hitec HS-5585MG servo by Ken Charron
https://grabcad.com/library/hitec-hs-5585mh-1
https://grabcad.com/ken.charron-1
The model is great, the gray image could be improved via rendering.

-
Step 2: Import and Modify
This is a great model. All of the components are separate bodies, and it imports without any major errors (great job Ken)
Modifications in this case were pretty simple:
· Fillet everything
· Add desired details
· Color the bodies/faces for rendering materials
Here are before (top) /after (bottom) images. The differences are very slight, so you’ll need to look closely.
Basically, I:
· Added small fillets to all the sharp edges
· Added an extrusion to simulate wires with their insulation removed
· Added a chamfer between the shell casings to emphasize the seam
· Split the geometry where the wires join into a separate body (like a grommet)
· Colored the geometry to define where different materials will be placed


-
Step 3: Research
What is this servo supposed to look like? I have a rough idea because Ken was kind enough to label some of the bodies with a material (i.e. “Brass Sleeve” and “Rubber Mount”), but maybe you won’t be so lucky with the model you choose.
For additional help, look to an image search engine. Google is good, but Bing can work too. Let me know if you have a favorite.
Searching online for the part number I found this image. It is missing some of the pieces, but it shows the basic idea of materials and colors.
The image is not very large, but try to see how all of the model edges are basically rounded.

-
Step 4: What about the decal?
Notice the decal in the image above? It would be nice to duplicate it as well.
I can think of a few options to make a label. I won’t detail all of them, but consider some pros and cons to each option:
· Create the label in the CAD model by extruding text and shapes.
· Search for a decal online and use it in the rendering software.
· Create a new decal in Photoshop.
I did not want to make the label in the CAD model.
I looked online for a decal, but found only very low resolution images. If you are going to use this method, you need a hi-res image to work with.
I made my decal in Photoshop. I used one of the low-res images as a guide, and then started stacking layers of the basic shapes/colors, along with some text layers.
When making the decal, consider where it is placed on the model, and how it will be seen. In my case the decal is partially hidden and out of direct sight, so I can cut some corners and make a less than perfect rendition. If the decal were very prominent, I would have spent additional time to find a more suitable font.
This is an online reference and my replacement:


-
Step 5: Rendering (setup)
This is more of an advanced tutorial, so I’m going to assume you’ve got the basics of rotating the model and camera in Keyshot. I’ll also assume you know how to apply an environment, and materials.
The basic outlines here are:
· Rotate the model to an attractive orientation
· Zoom in on the model, it is the focus here
· Apply an environment
· Apply materials to the model
· Apply your decal (assuming the model needed one)
The more advanced portion of this step is making little adjustments to the materials, scene, and lighting.
I often leave the scene and lighting alone unless there is something clearly bad like a weird reflection, a hot spot, or a problem with the color.
In this model I did adjust the materials a bit. Two images are shown, one is simply applying the materials, the second image makes some minor adjustments to mostly the colors involved. There is very little difference between the default “black rubber” and “black rough plastic”. I think in reality, there would be a difference in colors, so I tried to duplicate that.
Also keep in mind that very few things are pure black, or pure white. Move those color sliders a bit and give the model some variation.
I don’t often use a Depth of Field in my renderings, but they can be helpful if you are going for realism, that should be enabled now (under the Camera tab) if you want it.


-
Step 6: Rendering Separate Layers
Stopping at the previous step is certainly an option if you are low on time, but this tutorial is about some additional options, so read on!
I use the output from the last step as my base image in Photoshop, then I create some additional layers in Keyshot.
The first is a shadow pass. I think I detailed this in my prior Keyshot tutorial, so the steps are:
· Apply the Miscellaneous – Occlusion material to every part in the scene
· Go to the environment tab, turn off ground shadows, set the background to white
· Go to the image tab, set Brightness to 2, Gamma to 1
· On the Render tab/button, also enable the option for the Clown Pass
Your output should look like this:


-
Step 7: Photoshop
Photoshop is not a requirement here. Use whatever photo editor you are most comfortable with. The same holds true for the Keyshot steps above. Use whatever rendering package you are best with.
I open all of my images in Photoshop (the primary image, the Clown pass, and the Occlusion Shadow pass) then:
· Copy/paste the clown pass into the Primary image as a new layer
· Use a selection tool (i.e. Magic Wand) to select the Clown pass color(s)
· Select – Save Selection (so it can be easily reloaded later)
· Hide or delete the Clown pass layer
To make the image “crisper” let’s make a new image/layer
· Copy the Background layer
· Create a new image (Ctrl +N)
· Paste the Background layer into this new image
· Go to Image – Adjustments – HDR Toning
The basic settings I use are shown in this image:

· Copy this image, and paste it back into the Primary image as a new layer
· Set the new HDR layer to Overlay
· Create an all black Layer Mask (Alt + click the Layer Mask button)
· Reload or Activate the Clown pass selection which was saved earlier
· With a White Brush with Soft edges and about 40% Opacity, paint over the HDR Layer Mask
· Brush over a few areas a second time if they have some interesting detail or texture, just don’t overdo it
· Set the HDR Layer to have an opacity of 50 – 70%
· Toggle the HDR layer on and off to see the difference. Adjust as needed

Esben Oxholm has a great Youtube tutorial on the above steps. Esben is a Keyshot and Photoshop genius!
How to improve your renderings by amplifying the details https://www.youtube.com/watch?v=GLT_Tot4jSc
-
Step 8: Occlusion Shadow pass
Next is to work with the Occlusion Shadow pass
· Like before, select the Shadow pass image, then copy/paste it into the Primary image as a new layer
· Set this Shadow layer to Multiply mode
· Set the Oppacity of this Shadow layer to about 40 – 60%
· Toggle the Shadow layer on/off to see the difference and adjust as needed
Notice how it brought out the detail of the holes in the servo arm?

-
Step 9: Final Work
You can add more steps if you like. Maybe change the background, add a water mark, a filter or two, some text?
Below are a before and after example images.
Looking at the final image, I think one thing I would change, is to give each of the rubber mounts a slight rotation along the vertical axis. Doing so would make the model a little less perfect, and maybe a bit more "natural".
I might also add extra lighting to the left side of the model, it looks a little dark.
Or, I could leave it alone and call it done :)


