

Pre-printing Tips for Flexible PolyJet Materials

PolyJet currently offers a number of flexible materials: Tango and Agilus30 families. This tutorial will provide some tips to optimize the performance of these materials, using the various settings in GrabCAD Print.
-
Step 1: About the Materials
Agilus30 and Tango are rubber-like materials that simulate the look, feel, and function of flexible products. They offer a range of shore values, ranging from that of rubber bands to tire treads to shoe heels. They are good for printing products with soft-touch coatings, nonslip surfaces, rubber surrounds, and overmolding. Such as grips, pulls, handles, buttons, cables, seals, gaskets, packaging, and footwear.

They are PolyJet Photopolymers with superior tear-resistance, capable of withstanding repeated flexing and bending, making them great materials for rapid prototyping and design validation.
Agilus30 is stronger than Tango, with 200% greater tear resistance, 250% times greater tensile strength, and roughly 250% better elongation at break. It also offers an improved look and feel, with a smoother surface and a wider range of colors that includes clear, white, and black.

PolyJet flexible materials can be combined with rigid Vero and VeroVivid for parts that have flexibility as well as color. But adding color may decrease flexibility and vice versa. Play around until you find the proportion of color to flexibility that works for your model.

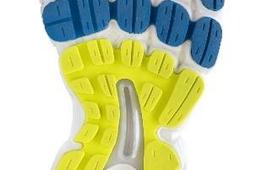
A colored, flexible part
-
Step 2: Part Orientation Tips
- Position thin and delicate parts face up. This improves resistance to tear.
- Run shorter jobs to increase adherence to the tray
- For parts with high aspect ratio (X:Y), position the longer edge along the X-axis. This reduces internal stresses that cause the parts to curve upwards and detach from the tray.

- If possible, position vertical walls parallel to the X-axis. This reduces the impact of the roller on the walls.

- To avoid curling, run shorter print jobs to increase adherence to build tray.
- Tango is prone to tearing along layer lines so orientate the parts on the build tray so that regions under tension will be printed in the X, Y direction rather than Z.
-
Step 3: Grid Style Tips
- The Heavy grid style is recommended. It minimizes the impact of the roller on thin walls and reduces the possibility of the part curling, shrinking, or deforming during printing.
- Lite is easier to remove. And there is less chance of thin sections and fine features being damaged or torn during support removal.
- Prefer a Lite grid for hollow and delicate parts.
-
Step 4: Surface Finish Tips
- Prefer a glossy surface finish for delicate and thin parts. This increases tear resistance.

- To avoid tearing, reduce stickiness, and improve part durability over time, consider coating the part with a flexible varnish or coating.

-
Step 5: Tray Preparation Tips
- Print semi-full trays to avoid roller waste leakage.
Have any questions, comments, or tips of your own to contribute? Feel free to comment below.
