

Tutorial: How to make paddle wheel?

I hope that you will like it even if it is simple. It's my first tutorial.
-
Step 1:
At first I want to show you description of Solidworks window to better understanding.
User interface overview: [resource: Solidworks 2010 Help]
-
Step 2:
So open new part by clicking on File > New > Part

-
Step 3:
Now select the plane (Front), in FeatureManager design tree, which you want to sketch on.
After that click on Revolve in the first marker called Features in CommandManager.
Now Solidworks opens sketch on the selected plane and changes view to normal view to Front.
-
Step 4:
Sketch shape by using icons Line and Sketch Fillet and give the shape dimensions according to the following picture.
Create the Centerline by clicking on the arrow next to the Line icon and select Centerline.
If you want to enter diameter, select the created Centerline and parallel line a go with cursor behind the Centerline and click.
Try to make the sketch in black colour, which means that you can’t move with anything from sketch.
When you have a dimensions in the sketch it needn‘t be whole black so you must relate the sketch to origin. In this example select the lowest line by clicking and push CTRL and click on Origin, now there is PropertyManager on the left side and chose Coincident in Add Relations box.
If you have it the same as on the picture click on ExitSketch in the top left corner.
-
Step 5:
Now Solidworks show you preview and if you have it the same as me click on OK in the top left corner.

-
Step 6:
Now click on Sketch in the second marker Sketch in CommandManager and select the top plane of the creating body.
In this sketch you need Line, Centerline, Circle, Trim Entities and Offset Entities.
Start with Circle and give its diameter 300mm. Now click on the cirle and tick For construction in box Options in PropertyManager.
After that create two Centerlines, which are 15 degrees from each other. By using Offset Entities create lines on both sides of the second Centerline according to the picture. Now close the created lines to the rectangle. Trim with Trim Entities overlapping ends of lines.
When your Sketch is the same as mine on the picture, click on Exit Sketch.
-
Step 7:
And now click on Sketch in the second marker Sketch in CommandManager and select the bottom plane of the creating body.
In this sketch you need Line, Centerline, Circle, Trim Entities and Offset Entities.
Start with Circle but don‘t give it diameter. Click on the cirle and push the CTRL button and click on the circle from the previous Sketch and select Equal in the Add Relations box and after tick For construction in box Options in PropertyManager.
After that create one Centerline and click on the ending point according to the picture with pushing the CTRL button and click on the opposite point in the previous Sketch. Now select Coinsident in the Add Relations box in PropertyManager. By using Offset Entities create lines on both sides of the second Centerline according to the picture. Now close the created lines to the rectangle. Trim with Trim Entities overlapping ends of lines.
When your Sketch is the same as on the picture, click on Exit Sketch.
-
Step 8:
Now Click on The arrow under the Sketch and select 3D Sketch.
Click on Spline and join points and push Esc. Now click on point next to the arrow and pull with it according to the picture.
Exit Sketch by clicking on the icon in the top right corner.
-
Step 9:
Now click on Loft in the first marker called Features in CommandManager. First select Line in Sketch2 and line in Sketch3 as profiles and after click to the Guide Curves Box and select curve from 3DSketch.
Click on OK to confirm the Loft.
-
Step 10:
Use Fillet which is in the same marker as Loft. Set Radius 5mm and select edges according to the picture and confirm by clicking on OK.

-
Step 11:
Now use Circular Pattern which is next to the Fillet icon under the arrow under Linear Pattern. Choose some cylindrical area to identify axis. In the third box select 14 instances. In the next box choose Loft1 and Fillet1 to make Circular Pattern and click on OK.

-
Step 12:
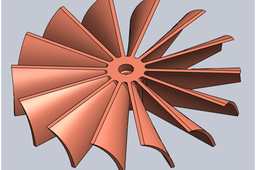
Finally you can change the colour too.
Click on Appearances/Scenes on the right side of window and choose in Appearances for example Copper and by double clicking on polished copper choose this material.
-
Step 13:
Now the paddle wheel is done.

