

Tutorial - Tip - insert a reference image into a sketch in SolidWorks

I will show you how to insert a reference image into a sketch.
You can do this in more then one sketch for a project and on more then one plane. When the image is no longer needed, just change the visibility of the sketch the image is in
For this tutorial, I will be using an image of a vase to reference in creating a model of a similar vase.
-
Step 1:
Open a new sketch on the front plane.

-
Step 2:
Draw some reference geometry to help in positioning and sizing of the image.

-
Step 3:
For this vase I am only concerned with the height. I drew a vertical center line 225mm high, and made the bottom of it coincident with the origin.

-
Step 4:
Now to insert the image:
Go to 'Tools', 'Sketch Tools', and 'Sketch Picture'
-
Step 5:
Select the image file to insert and click 'Open'

-
Step 6:
Now the image is in the sketch but is not sized or orientated correctly.

-
Step 7:
Use the command boxes to the left to change the size and orientation of the image or just drag the boxes around the image to re size and position. This is what the reference sketch made in Step 3 is used for.
The Transparency of the image can also be adjusted so the image will not obstruct sketches made.

-
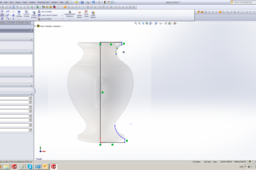
Step 8:
Close out of the sketch and now you have a fully defined sketch with the image at the correct dimensions.
Open a new sketch on the same plane.

-
Step 9:
Now create a sketch using the image as a reference knowing that dimensions and proportions are correct.

