

Tutorial: Using Sketch Picture

Here we go!
-
Step 1:
Step 1: First you will need to create a new sketch. This sketch should be on the same plane that coincides with the correct view of your blueprint. I have chosen to use the right plane for my first sketch.

-
Step 2:
Step 2: Select the "Sketch Picture" tool in the following menu (Solidworks 2010) Tools > Sketch Tools > Sketch Picture.

-
Step 3:
Step 3: Then choose a .jpg file. I labelled my separate blueprints as top, right, front, and back. Since I have started my sketch on the right plane, I will select the file labelled "right blueprint".

-
Step 4:
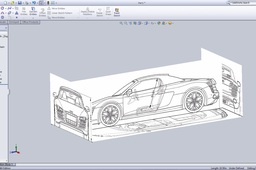
Step 4: The .jpg file is successfully imported into a part sketch. From here it gives you options to position the sketch in relation to the part origin. I recommend that you leave the origin positioned at the bottom left corner. This will make it easier to line up the other three views. Click finish and exit sketch. I recommend to also label this sketch as "right blueprint" or which ever view you decided to paste in first in order to avoid confusion.

-
Step 5:
Step 5: You can repeat these steps with each view. For the back view you must create a plane. Most of the blueprints you will find will not be high quality, so lining them up perfectly isn't exactly necessary. Just make sure that most of the features of each blueprint view are matched up with others. The closer your pictures are lined up, the less problems you will have in completing a model like this.

