

3D Modeling and Animation of a Soldier in DAZ Studio - Part I

The aim of the practice is to use the capabilities of the software to create realistic 3D models of characters.
The main steps are as follows:
1. A selection of „Interface Layouts”: from Window > Workspace > Select Layout > „Hollywood Blvd”. "Hollywood Blvd" includes several activities ("Activities"), initially starting with the first - Actors, Wardrobe & Props. The Smart Content Pane opens and then select Files.
2. Place a character in the scene: from Files > Figures > Creatures/People. After selecting the desired character, it is placed in the workspace (Viewport) by dragging (with the left mouse button pressed) or double-clicking. In this example the model selected is Genesis 8 Basic Male.
3. A selection of clothing and accessories: from Files > Wardrobe. If a change is required subsequently, it is necessary to select that part of the clothing to be deleted. This is done using the Surface Selection Tool and then press Delete.
4. Fitting the clothing: it is necessary to make a correction if the clothing does not cover the body properly when it is directly placed on the model. This part ot the clothing is selected and from the panel on the right select Fit to and press the None button. In the window that appears, select Genesis 8 Male from the drop-down menu and press the Accept button. If an Auto-Fit:... window appears, it is necessary to specify for which model the specific garment is originally intended. There is an option to select just a piece of clothing and click on Parameters, from where the size and position of the selected item can be edited precisely using the Scale and Translate options. A similar procedure is used when parts of the character's body (hair, facial features, body structure) need to be edited.
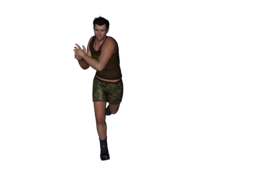
5. A transformation of the base model: it is necessary to select the entire model with the clothing using Region Navigator Tool. The base model can be transformed with help from Actor, Wardrobe & Props
For this purpose, Editor and Shaping must be active.
6. Rendering the scene: use the editor (Editor), which is located in the right panel. If the software is installed on a computer with a 64-bit version of Windows, then it can work with Engine: NVIDIA Iray (not supported on a 32-bit version). Select Render > Editor: Render Mode > Photoreal/ Interactive and then click the Render button and select a graphic file format.
-
Step 1: Selection of „Interface Layouts”

-
Step 2: Place a character in the scene

-
Step 3: Selection of clothing and accessories

-
Step 4: Fitting the clothing

-
Step 5: A transformation of the basic model

-
Step 6: Rendering the scene

